Adding a new border to your backyard transforms your whole outdoor living space. It gives your family instant privacy and keeps your pets safe inside the yard. Selecting the right material makes a massive difference in how much free time you have on the weekends. Wood rots over time and requires constant painting or staining every few years.
Choosing a modern synthetic material eliminates those exhausting maintenance chores permanently from your schedule. A professional vinyl fence installation gives you a beautiful boundary wall that handles harsh weather easily. It stays bright and clean without peeling, warping, or cracking down the line. This detailed guide walks you through the entire process of setting up your new yard border.
Understanding Your Property and Project Budget
Before you dig your first hole, you must figure out the scope of your project. You need to locate your exact property lines so you do not accidentally build on your neighbor’s land. Check your local zoning rules regarding height limits for backyard barriers before buying materials. Knowing these rules ensures your project moves forward smoothly without legal issues.
Planning your finances early helps you pick the right styles and panel designs for your home. The total vinyl fence cost depends heavily on the linear footage and the specific style you choose. Hidden expenses like building permits or hidden underground rocks can change your final budget numbers. Getting a clear idea of these financial factors keeps your home improvement project stress-free.
Checking Local Guidelines and Utility Lines
Every town has specific building regulations that govern how high your backyard structures can stand. You must call your local utility company to mark underground pipes and wires before breaking ground. Striking an active power line or water pipe ruins your backyard project instantly and costs a fortune. Taking this quick safety step keeps your neighborhood safe and your project legal.
Gathering Your Tools and Layout Supplies
You need the right equipment on hand to build a straight and level yard barrier. Gather a sturdy post hole digger, a long tape measure, a string line, and a torpedo level. Having high-quality, quick-set concrete ready ensures your support structures cure fast and stay rigid for decades. Laying out your tools on a tarp keeps your workspace organized throughout the day.
Selecting Your Fence Style and Materials
Choosing your panels is the fun part of upgrading your home’s curb appeal. Look for thick, commercial-grade components that feature internal aluminum reinforcement channels for maximum wind resistance. Buying matching gates, decorative post caps, and heavy-duty latch hardware completes your material order list. High-quality materials ensure your hard work stands tall against strong winter storms.
Mapping Out the True Border Line
Creating a straight line requires precision and patience during the initial layout phase. Drive wooden stakes into the ground at each corner of your planned boundary area. Tie a bright nylon string tightly between these stakes to establish your straight guideline. This line acts as your visual path for placing every single support structure perfectly.
A straight layout prevents your panels from binding or looking crooked from the street. You will want to mark the exact center point for every post along the string line. Use a temporary marking spray paint to highlight each digging spot clearly on the grass. Double-checking your measurements now prevents alignment mistakes that are very difficult to fix later.
Measuring the Interlocking Panel Sections
Most standard panel sections measure exactly six or eight feet in length from center to center. You must account for the width of the support posts when marking your digging spots. If your math is off by even an inch, the panels will not slide into the routed holes. Take your time measuring twice so your materials fit together like puzzle pieces.
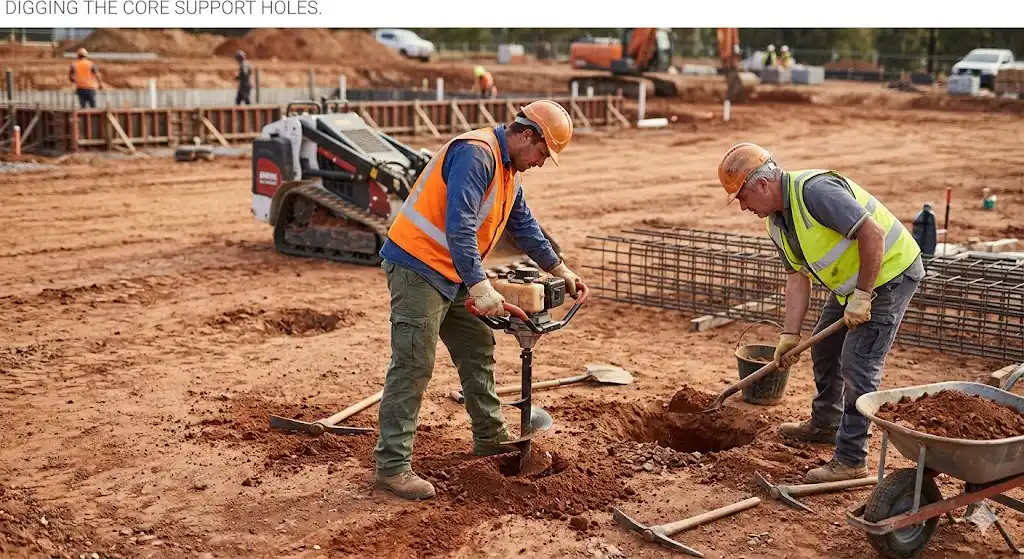
Digging the Core Support Holes
The strength of your entire structure relies entirely on the depth of your subterranean supports. You need to dig down below the local frost line to prevent seasonal shifting. In most areas, this means digging holes that measure roughly three feet deep and twelve inches wide. Consistent hole depth keeps your entire perimeter perfectly level across the changing yard terrain.
Using a gas-powered auger makes this heavy digging work much faster and easier on your back. If you encounter thick tree roots, use a sharp root axe to clear the path downward. Keep the sides of the holes straight rather than bell-shaped to prevent frost heaving later. Clearing out loose dirt from the bottom gives your concrete a solid foundation.
Preparing the Hole for Concrete Placement
Pour a three-inch layer of crushed gravel into the bottom of each empty hole before adding concrete. This gravel bed allows rainwater to drain away from the bottom of your support structures. Proper drainage prevents water from pooling under the structure and softening the surrounding soil. This simple step keeps your foundation rock-solid through heavy spring rains.
Setting the Essential Anchor Posts
Now you are ready to install a vinyl fence by securing the primary corner posts first. Place the heavy corner post directly into the prepared hole and check it with your level. Mix your concrete according to the package directions until it reaches a thick, oatmeal-like consistency. Pour the wet mixture around the post while keeping the structure perfectly plumb.
Aligning the Line Posts and Checking Heights
Once your corner anchors cure, run a tight string line across the top of them. This top line helps you set the intermediate line posts at the exact same height. Adjust the depth of each post by adding or removing gravel beneath the base. Keeping the heights uniform creates a clean, professional look across your entire property line.
Assembling the Heavy Vinyl Panels
With your posts firmly anchored in concrete, you can begin fitting the horizontal rails. Slide the bottom rail into the pre-routed slots near the base of the support posts. Make sure the locking tabs click securely into place inside the internal structure. The bottom rail supports the weight of the vertical pickets you will insert next.
Sliding in the Vertical Privacy Pickets
Drop the interlocking vertical pickets into the bottom rail one by one until the section is full. They should snap together easily without requiring heavy force or specialized building tools. Once all pickets are in place, slide the top rail over them to lock the panel section together. Secure the rail ends into the post slots to finish the section.
Securing the Gates and Hardware Accessories
Assembling the entrance gates requires extra care because these areas experience constant movement and physical stress. Use heavy-duty internal aluminum inserts inside the gate posts to prevent sagging over time. Install adjustable stainless-steel hinges and a lockable latch system for smooth operation every single day. Align the gate carefully so it swings freely without dragging on the grass.
Attaching the Protective Decorative Post Caps
Apply a thin bead of clear vinyl adhesive to the inside lip of your decorative caps. Press the caps firmly onto the top of each post to seal out rain and debris. This adhesive keeps the caps from blowing off during high winds or heavy autumn storms. The caps provide a finished look that pulls your entire yard project together.
Maintaining Your Shimmering New Barrier
Learning how to install vinyl fence panels is only the first part of owning a beautiful yard boundary. You also need to know how to clean vinyl fence sections to keep them looking brand new. Algae and garden dirt can accumulate on the surface over the changing seasons. Regular upkeep prevents stains from baking into the material under the hot summer sun.
Simple Washing Tips for Homeowners
Wash your panels down with a standard garden hose and a soft microfiber cloth once a year. For stubborn mud spots, mix a mild dish soap with warm water in a household bucket. A gentle scrub removes environmental grime without scratching the smooth outer finish of the material. Avoid using abrasive scrubbing pads that can dull the shiny protective surface.
Your Trusted Local Long Island Fencing Experts
Mastering how to install vinyl fence steps takes a lot of hard physical labor and specialized tools. If you want a flawless result without spending your weekend digging holes, let professionals handle the job. The experienced team at Exclusive Fence Company, Inc. handles projects of all sizes across Long Island. We bring premium materials and precision craftsmanship to every single backyard layout.
Our skilled professionals ensure your new perimeter looks incredible and stands strong for decades. We take care of everything from local utility checks to the final cleanup process. We serve homeowners in Medford, NY, Patchogue, NY, Coram, NY, and all surrounding areas. Call Exclusive Fence Company, Inc. today at +1 631-946-4740 to get your free project quote.
FAQS
How long does a vinyl fence last?
A high-quality vinyl fence can easily last thirty years or longer with basic care. The durable material resists rotting, fading, and insect damage over time.
Can I install a vinyl fence myself?
Yes, you can complete this project yourself if you have the right tools and patience. Working with a professional team ensures perfect alignment and saves you from heavy digging.
Does vinyl fencing fade in the sun?
Modern vinyl materials contain special sun-blocking chemicals that prevent yellowing and fading from sunlight exposure. Your border stays bright and clean for decades.
How do I fix a sagging vinyl gate?
You can adjust the heavy-duty hinges or add a diagonal turnbuckle anti-sag kit to lift the gate. Adding internal metal inserts to the gate post prevents sagging permanently.